


Description
Quick-Release Splitter Support for 1992–2000 Honda Civic, 1993–1997 Honda Del Sol, and 1994–2001 Acura Integra
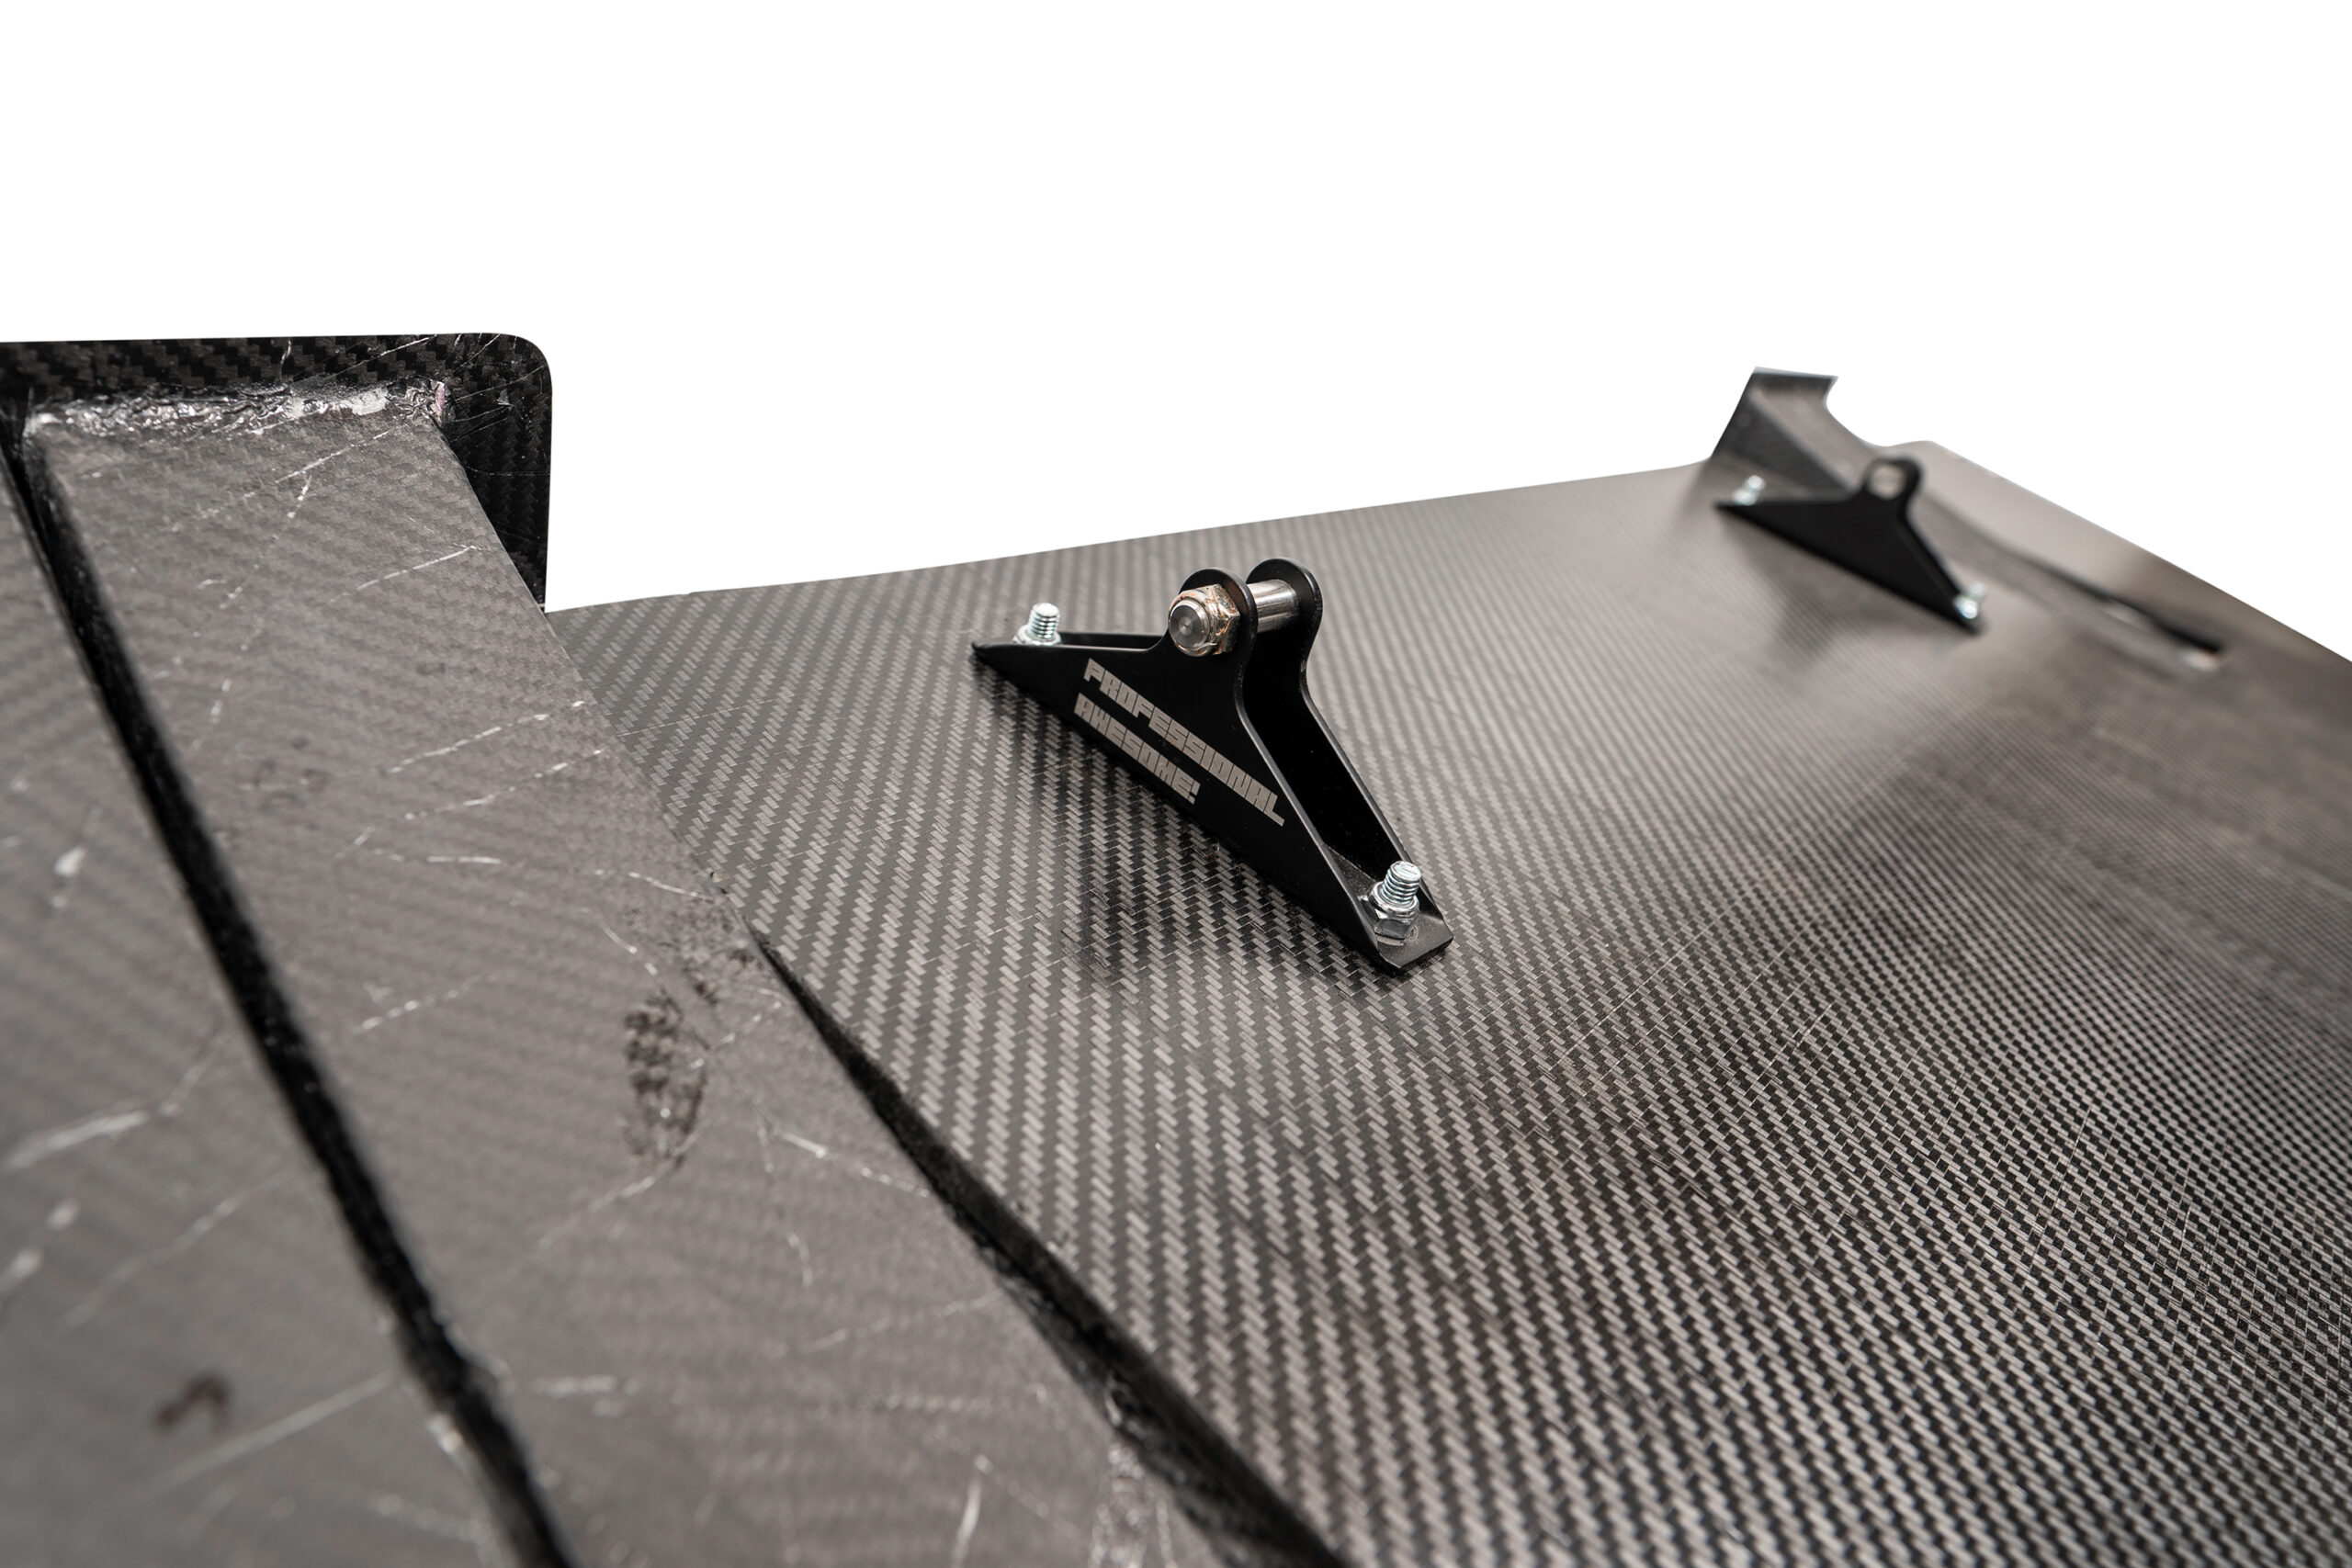
This chassis-specific system removes much of the fabrication normally required to mount our quick-release latches to the car. Once the vehicle-side mounts and splitter-side receivers are installed and aligned, the splitter can be removed and reinstalled without tools for normal operation.
Guide both receiver pins into the latches, confirm that both latches are fully engaged, and the splitter is secured. Pull the release levers directly or connect customer-designed cables or pull rods when remote access is preferred.
The Cliff Notes
- Choose between chassis mounts with integrated tow-hook points and thinner no-tow-hook mounts intended to reduce the likelihood of a splitter impact deforming the OEM chassis mounting points.
- Both mount versions reduce fabrication and attach without drilling on the tested application.
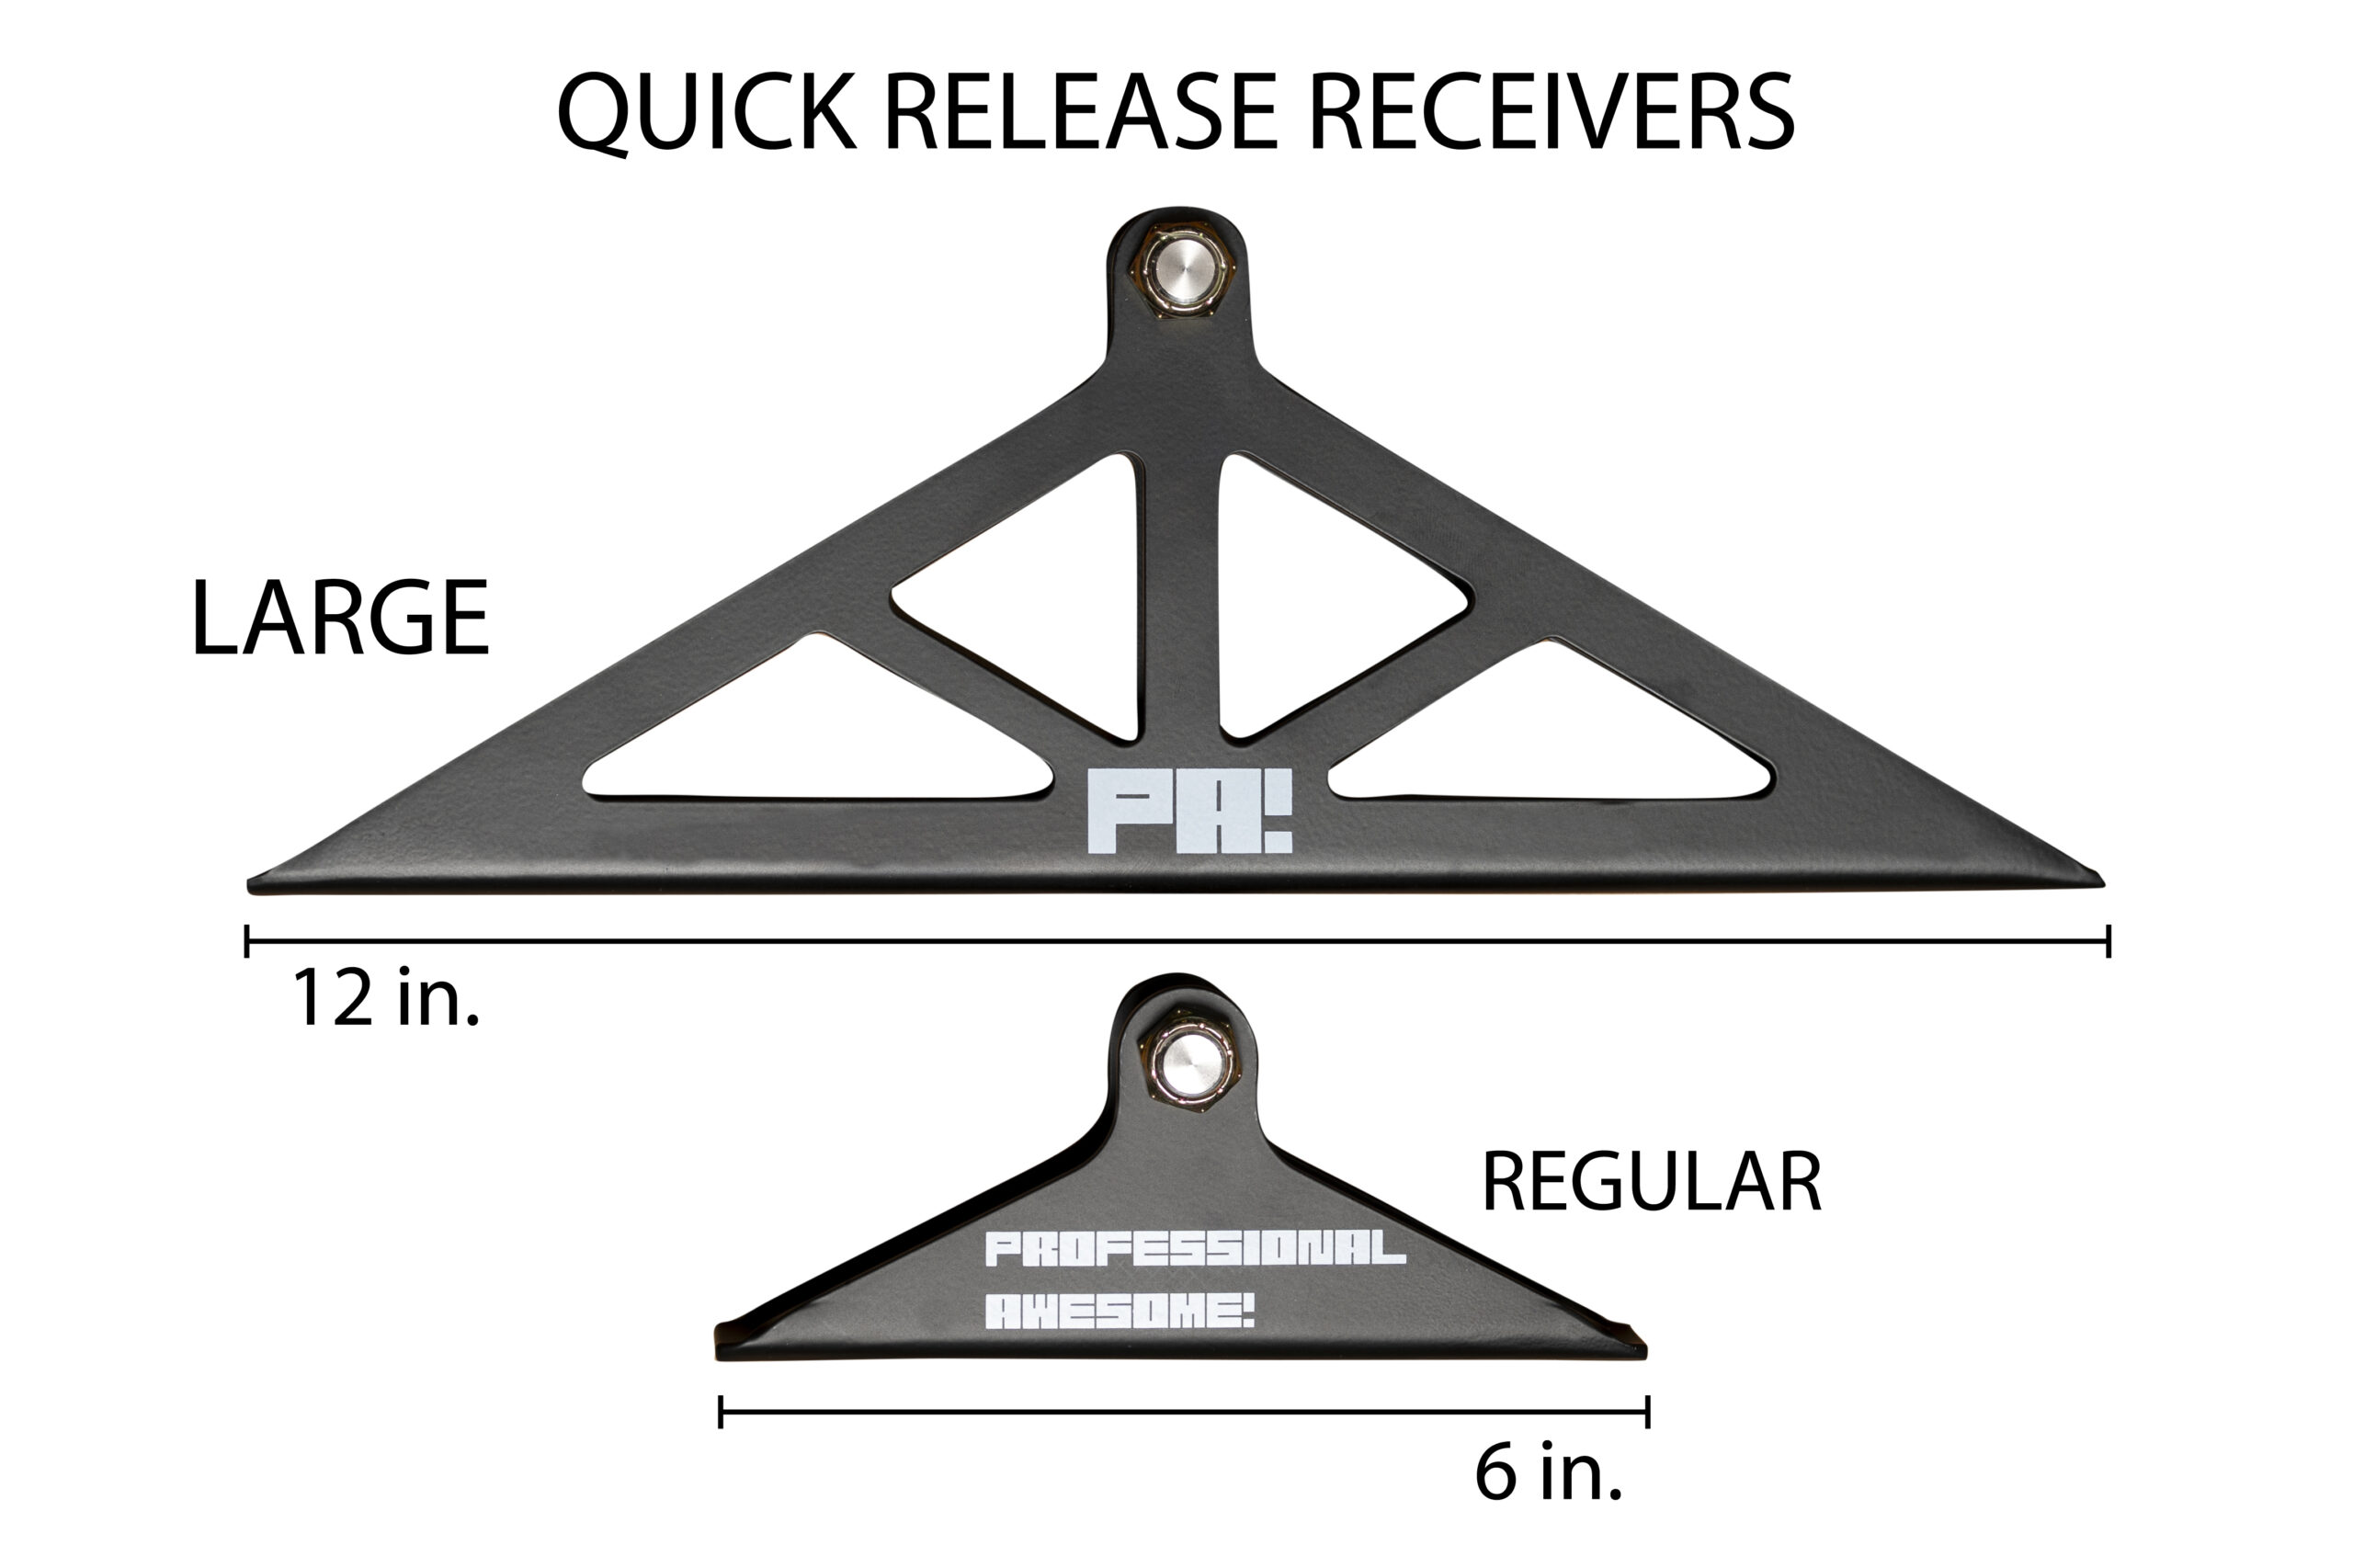
- Regular and Large receivers provide different packaging, ground-clearance, and load-distribution options.
- Choose receiver mounting hardware for the splitter material and finished blade thickness.
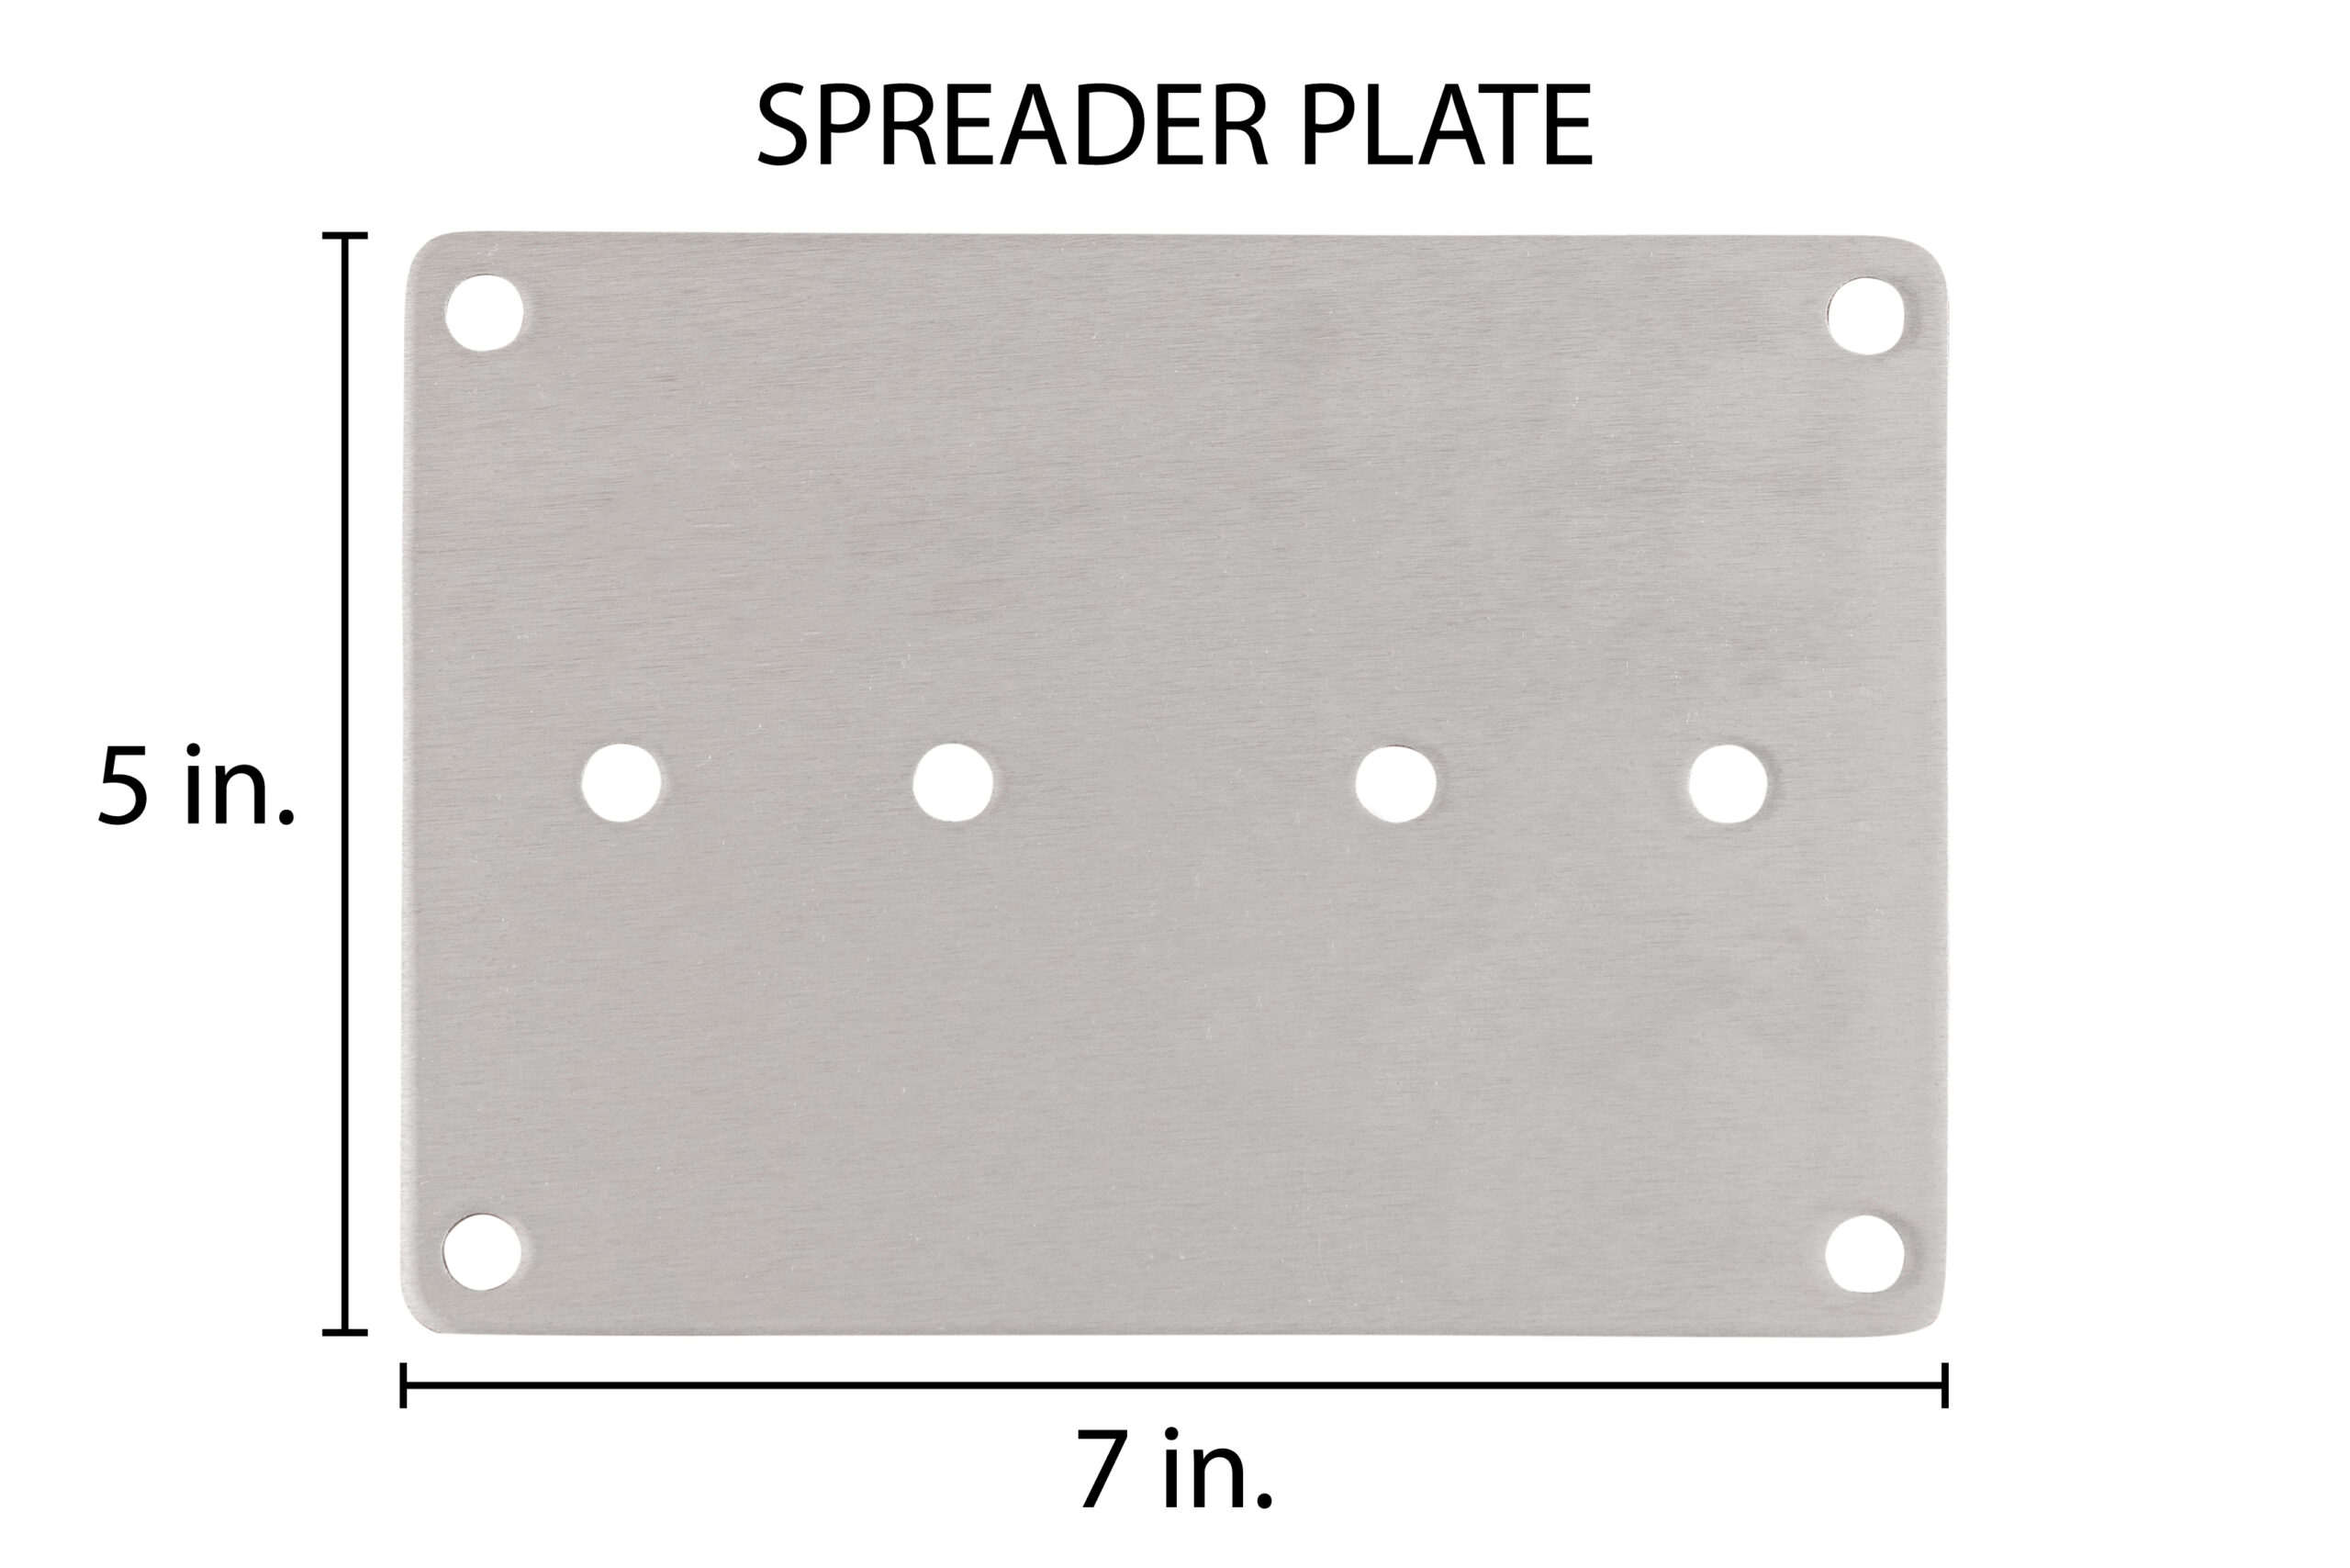
- Optional spreader plates distribute receiver loads over more of the splitter blade.
- At least one additional rigid support is required to prevent the splitter from rotating around the receiver pins.
Vehicle Fitment and Chassis Mounting
Both chassis-mount versions replace the factory front tie-down/tow hooks and attach without drilling on the tested chassis listed above. The adjustable latch mounts provide additional vertical range and pitch adjustment for fitting the splitter to the car.
Chassis Mount Options
| Mount version | Material and thickness | Primary tradeoff |
|---|---|---|
| With Integrated Tow Hooks | 3/8-inch (0.375-inch) 6061-T6 aluminum | Preserves front tie-down/tow-hook points after the OEM pieces are removed. The thicker, stiffer mounts are less likely to deform during a splitter strike. |
| Without Tow Hooks | 3/16-inch (0.187-inch) 5052-H32 aluminum | Gives up the tow-hook points in exchange for a thinner, more formable mount that is more likely to bend before an impact load deforms the OEM steel chassis mounting points. |
The no-tow-hook design reduces—but cannot eliminate—the risk of impact damage being transferred to the chassis. Inspect the mounts, fasteners, and OEM steel after any splitter impact or off-track excursion, and correct or replace deformed parts before returning the car to service.
No-drill fitment refers to attaching the supplied mounts to the tested chassis. Splitter blades, bumper covers, undertrays, ducting, and other vehicle modifications vary, so trimming or additional installation work may still be required to route the mounts and align the complete splitter system.
How the System Works
- Install the vehicle-specific chassis mounts. Use the supplied hardware and structural mounting locations described for this application.
- Attach and adjust the left and right latches. Position them so the receiver pins enter cleanly and the planned splitter height is maintained.
- Attach the receivers to the splitter blade. Select receiver hardware that suits the blade material and thickness.
- Install a separate rigid support. The receiver pins allow rotation, so the completed splitter needs another support system that controls movement in both directions.
- Test both latches before driving. Confirm full engagement, free release-lever movement, and adequate clearance through the complete suspension and bodywork range.
Choose Your Configuration
1. Chassis Mount Version
Choose With Integrated Tow Hooks to retain the front tie-down/tow-hook points removed during installation. Choose Without Tow Hooks when the thinner 5052-H32 mounts and their greater likelihood of bending in a splitter impact are preferred. The no-tow-hook version does not require or include the six longer M10 x 1.25 JIS chassis screws, and it uses six 20mm M6 screws in place of the 30mm M6 screws supplied with the tow-hook version.
2. Receiver Size
| Receiver | Approximate dimensions | When to choose it |
|---|---|---|
| Regular | 6-inch base; pin center about 2 inches above the splitter | The best choice for most cars and tighter bumper packaging. |
| Large | 12-inch base; pin center about 4 inches above the splitter | Moves the latch higher for more clearance with the splitter removed and spreads load over a wider footprint, but requires more space. |
3. Spreader Plates
Spreader plates are available only with Regular receivers. One plate is supplied for each receiver. They distribute load over a larger blade area and can help with thinner, more flexible, or lower-strength splitter materials.
- Each plate adds 3mm to the receiver mounting stack, so subtract 3mm from the maximum blade thickness listed below.
- Spreader-plate configurations use 16 receiver mounting positions unless No Receiver Mounting Hardware is selected.
- They are optional; blade material, stiffness, receiver loads, and the rest of the support system should guide the choice.
4. Receiver Mounting Hardware
Choose the receiver-to-splitter hardware based on the splitter material and finished blade thickness. Elevator bolts are intended primarily for wood-based blades, where the wide flat head and square shank can seat slightly into the material and resist turning. The 40mm flat screws with black aluminum washers are better suited to aluminum, carbon fiber, composites, and other materials that should not accept a square shank.
| Hardware | Recommended application | Maximum blade thickness | With 3mm spreader plates |
|---|---|---|---|
| 30mm Elevator Bolts | Wood-based splitter blades | 14mm | 11mm |
| 35mm Elevator Bolts | Wood-based splitter blades | 19mm | 16mm |
| 40mm Flat Screws + Aluminum Washers | Aluminum, carbon fiber, composites, and other non-wood blades | 16mm | 13mm |
Choose No Receiver Mounting Hardware when supplying specialized fasteners or using hardware already on hand. This removes only the receiver-to-splitter fasteners, washers, and matching nuts; all vehicle-side hardware and latch-to-mount hardware remain included.
What Is Included
- 2 selected vehicle-specific chassis mounts: 3/8-inch 6061-T6 aluminum mounts with integrated tow-hook points, or 3/16-inch 5052-H32 aluminum mounts without tow-hook points
- With the integrated-tow-hook version, 6 M10 x 1.25 JIS screws and 6 M6 x 1.0 x 30mm screws for attaching the mounts. With the no-tow-hook version, the six longer M10 screws are not required or included, and 6 M6 x 1.0 x 20mm screws are supplied instead of the 30mm M6 screws.
- 2 quick-release latches, one left and one right
- 2 splitter receivers in the selected size, each with a stainless steel pin
- M6 x 1.00 hardware for attaching the latches to the adjustable mounts
- The selected receiver mounting hardware for 4 positions with Regular receivers, 8 with Large receivers, or 16 with Regular receivers and spreader plates. Elevator-bolt and flat-screw choices include matching M8 nyloc nuts; flat-screw choices also include black aluminum washers.
- If selected, 2 spreader plates
Release cables, pull rods, remote handles, and their brackets are not included because access and routing vary by vehicle and build.
Installation and Inspection
- Dry-fit the vehicle-side mounts, latches, splitter, and receivers before drilling the splitter blade.
- Align both receiver pins so they enter the latches without binding and both latches close positively.
- Install at least one separate rigid support and confirm the splitter cannot rotate in either direction around the receiver pins.
- Verify that release levers, cables or pull rods, bodywork, and nearby components cannot interfere or release unintentionally.
- Perform a nut-and-bolt check before and after every event and inspect the complete system after any splitter impact or off-track excursion. Replace a deformed no-tow-hook mount and inspect the OEM steel mounting points before returning the car to service.
Correct looseness, deformation, cracking, interference, incomplete engagement, or heavily worn parts before returning the car to the track. Individual latches, receivers, spreader plates, hardware, mounts, and support-rod components are available in our Splitter Mount and Support Rod Spare Parts category.
Important Support Requirement
The receiver pins allow the splitter to rotate relative to the latches. At least one additional rigid mounting system is required to control that rotation in both directions. We highly recommend our Splitter Support Rods, but a properly designed custom mount or another manufacturer’s rigid support can also perform this job.
The latch manufacturer rates each latch to resist opening under loads upwards of 700 lb. This is a latch rating, not a load rating for the completed splitter installation. Finished capacity depends on the chassis mounting points, fasteners, splitter material, support geometry, installation quality, aerodynamic load, and track impacts.
See the System in Action
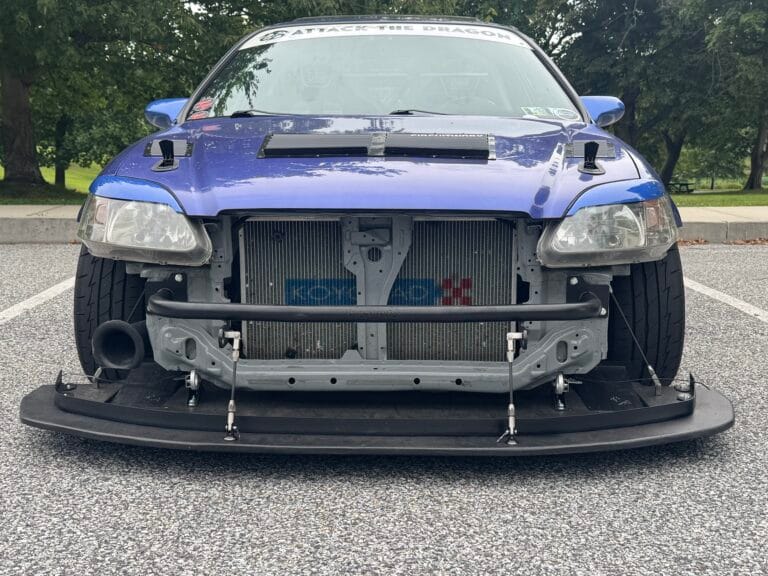
This chassis-specific kit is used on the Gears and Gasoline time-attack Honda Civic:
Grant –
These are by far the best splitter brackets for legacy chassis Hondas and Acuras!
They are strong, but light, and extremely easy to use. Compared to the other options on the market, they’re much easier to install and remove the splitter, which is a huge plus when working on the car either at home or the track.