
In the 10+ years of track experience we have had, we’ve made a lot of mistakes and learned a lot of lessons. Hopefully, the lessons in this article will make life easier for you. First things first, I may interchange the words water and coolant, don’t get mad at me. In practice, you use water and coolant differently for different applications. Assuming you’re trying to maximize engine cooling, water cools more efficiently than coolant. It is also safer to use on a racetrack as it is less slippery in the case of spills.
That being said, water will freeze at 32 F (0 C), so don’t use pure water if there’s any chance of being near freezing temps. Additionally, pure water can lead to corrosion, weird particulates and sludge, when used for long periods of time without some sort of conditioner. If you have a dual-purpose street/track car, the basic info below applies to equally to coolant as well. Enjoy!
The biggest lesson, pressure management
We’re going to start very basic, so bear with me, but rule number one: as water pressure increases, so does the boiling point. This is perhaps the most important thing to know about your cooling system. Why? Coolant needs to be in contact with the inner surfaces of your engine and radiator to cool. If the coolant boils, it’s no longer in contact with surfaces and then thermal failures can occur very quickly.
Engines normally operate in a coolant temperature range of roughly 180 °F – 200 °F (82 °C – 93 °C) window. In standard atmospheric conditions, water boils at 212 °F (100 °C). You can see, without additional pressure, the engine is very close to reaching the standard boiling point of water. If you’re at the track, with extended high throttle conditions, the engine will produce additional heat. Without additional pressure, that heat will start boiling your coolant easily. Next thing you know, you have a broken engine.
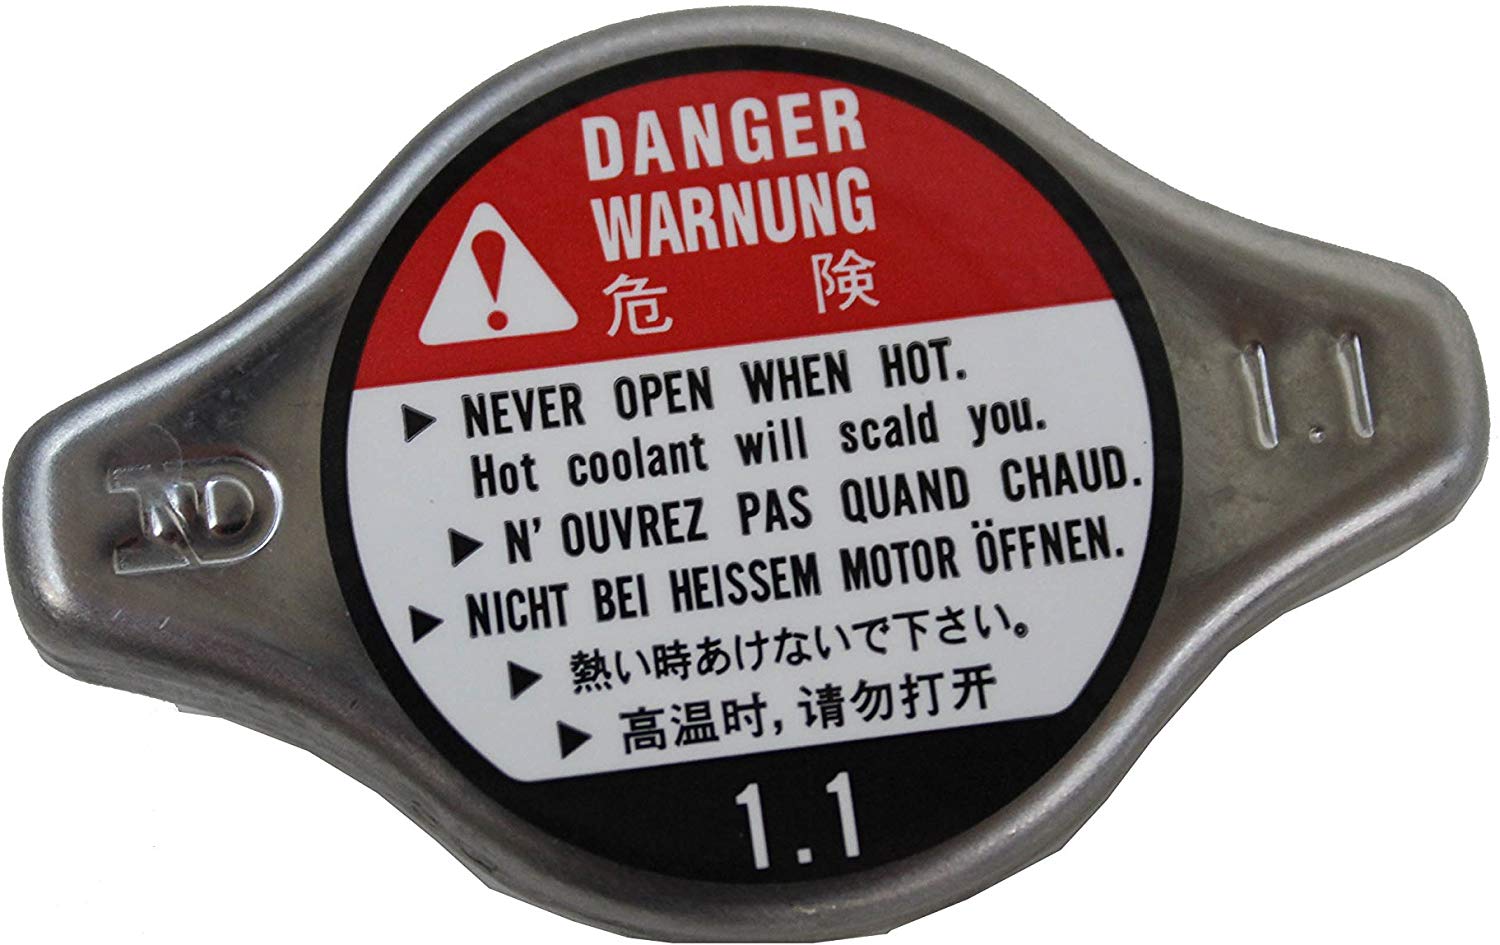
Luckily, vehicle designers took this into account and came up with a pressurized cooling system! If you notice, there are the digits, 1.1, on your Fast and Furious Honda Civic radiator cap. This stands for 1.1 bar of pressure (about 16 psig). Side note, this number isn’t taking into account standard atmospheric pressure, which can be confusing. That 1.1 bar of pressure, in addition to the aforementioned normal atmospheric pressure, magically increases the water’s boiling point to about 250 °F (121 °C). This gives you much more headroom for heat to enter the coolant, without boiling. Thanks science nerds for figuring that one out!
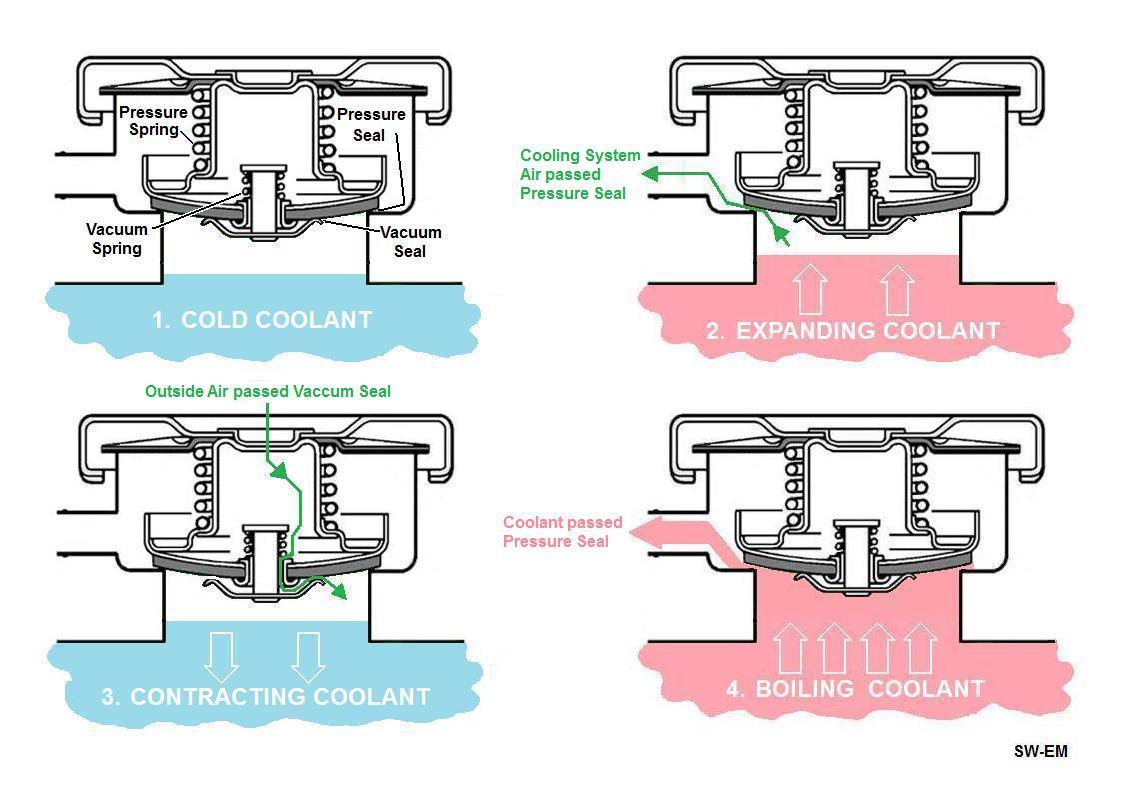
You may be wondering, how does the cap increase pressure and boiling point? Well, it doesn’t. The cap acts as a two-way valve. Depending on coolant system conditions, it will hold pressure, open to relieve pressure or open the other way to relieve vacuum. When the engine warms up, the water expands, increasing pressure. In the case of the 1.1 bar Civic radiator cap, it will keep the system pressurized until 1.1 bar (16 psig). After that, the radiator cap will overflow coolant into an unpressurized reservoir tank. Once the system cools back down and compresses, it’s possible that the cooling system would be under vacuum. In these conditions, the radiator cap will allow coolant to flow back from the reservoir, refilling the system. Neato!
It should be noted, just because your radiator cap says 1.1 bar, your system may not fully reach that pressure. This means, you might not exactly have a 250 °F boiling point in practice. Additionally, any air in your system hurts the pressure increase as well, lowering the max boiling point.
REALLY FREAKING IMPORTANT NOTE ABOUT CHECKING COOLANT LEVELS
The last little paragraph above is critically important for track day drivers. Why? At the track, we can have cooling system issues, causing us to lose coolant while out in a session. This will then cause us to check coolant levels. While not recommended, many of us relieve the pressure of a warm system by slowly removing the radiator cap. Then we top off the coolant/water and head back out. DON’T DO THIS.

The cooling system relies on temperature differential to increase system pressure to a point where the coolant won’t boil. If you release the pressure at a high temperature and go back out before the system fully cools, guess what? Your cooling system’s boiling point is dramatically lower, making your car more likely to overheat. While it is critically important to replace any lost coolant during a session, it is also critically important to keep the cooling system in the proper pressure window. Don’t open the system at higher temps, unless you can re-pressurize! See the MotoIQ article below for Dave Coleman’s tips and tricks to get around this problem.

Now that we have a basic understanding of cooling system pressure, it is important to understand that the cooling system has different pressures in different areas. Bernoulli’s principle shows us that flow will indicate pressure levels. Areas of high flow, such as the return line from the radiator to the water pump, will have relatively lower pressures. Areas of low flow, such as in front of the thermostat or convoluted areas of the engine block and cylinder head, will have relatively high pressures. Then to complicate things further, heat effects pressure. With higher temperatures yielding higher surface pressures (unless the coolant is boiling). Why is this important? This means each area has different, localized boiling points. Most importantly for this lesson, the radiator cap may be seeing pressures differently than we’d expect.
REALLY FREAKING IMPORTANT NOTE ABOUT RADIATOR CAP LOCATIONS
Different vehicle manufacturers use different radiator designs with one design in particular being extra crappy for track usage. That design is called a “down-flow” radiator. These are very common in the Honda, Mitsubishi, and Subaru worlds (I’m sure there are more). You can tell you have a down-flow radiator core if the end tanks of the radiator are at the top and bottom, rather than on the sides of the radiator. The reason the radiator design sucks is due to the placement of the radiator cap on the high pressure, top end tank of the radiator.
At high engine speeds, your water pump flows high volumes of coolant. This is normally a good thing, BUT your radiator is a flow restriction. If the radiator cap is on the high-pressure side, the increased flow may cause back pressure. This back pressure dramatically lowers the potential pressure the system can hold from natural temperature induced pressure increases. This can prematurely cause coolant to release through the radiator cap and into your reservoir. This ultimately reduces overall system pressure, making it more likely for your coolant to boil.


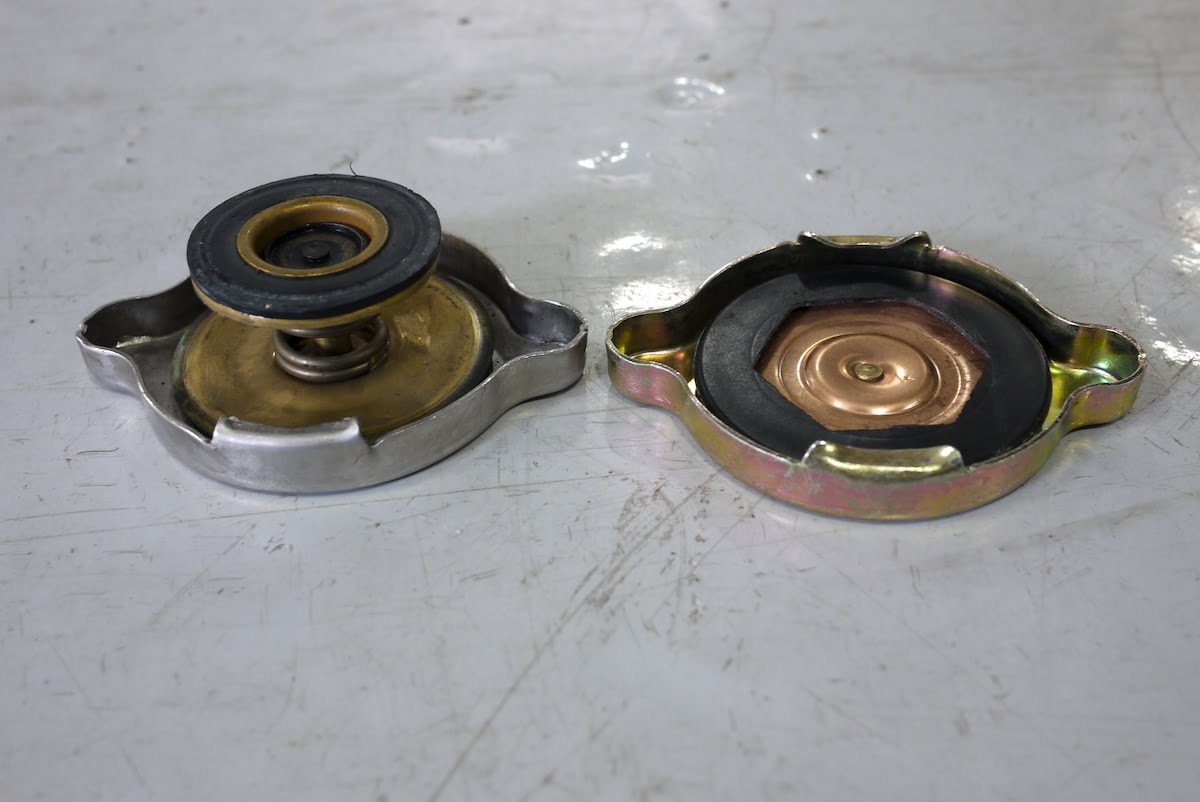
If you have a down-flow radiator design, you can look into replacing your OEM style radiator with a “cross-flow” radiator core. Unfortunately there aren’t many bolt-in solutions that I’ve found. To continue using the down-flow core, add a fitting to the low-pressure end tank and then run it to an external coolant expansion tank, with its own radiator cap. Make sure that the new expansion tank is the highest point of coolant in your system. Next, completely remove your existing radiator cap from the high-pressure end tank. Accomplish this by with welding a plate onto an aluminum radiator. Alternatively, use a dummy radiator cap. These are also called no-spring radiator caps and were available on cars like the FD RX-7. Then, use the existing overflow port on the radiator as a bleed to your new coolant expansion tank.
This bleed line needs to be small, ¼” (6 mm), to ensure excess flow through the line doesn’t build up pressure in your expansion tank at high RPM levels. If you are doing this modification, keep in mind that your radiator core may see increased pressurization. Ask the core manufacturer for data on safe, operating pressure levels. Additionally, make sure your lines and hoses are rated to operate safely at higher pressure levels as well.
Coolant flow is king
Simply put, the greater the coolant flow, the easier it is to keep your engine cool. There is a stupid myth going around that states you don’t want coolant moving through your engine too quickly. The thought is that coolant needs to stay in the radiator longer to reject more heat and in the engine longer to absorb more heat… all of this is dumb.
You want as high of coolant volume moving as possible. Why? Water absorbs and dissipates heat on an exponential curve. The longer you cool water, the rate at which is cools decreases and the longer you heat water, the rate at which it heats decreases. All this assumes a consistent source of external heating or cooling.
If you slowly flow the water to absorb more heat from the engine, as the water warms, the rate at which it absorbs the heat drops, causing the engine components themselves to heat up. The same goes for the radiator. The more slowly you flow coolant through it, the more the rate of the water cooling slows down. Therefore, if you have higher flow rates, you can keep the water doing its job most efficiently. Additionally, higher flow rates will cause the engine to be more evenly cooled, as the coolant is working in a narrower temperature range.

How does this translate into the real world? Assuming no aftermarket water pumps exist for your vehicle, make sure to use smooth bends on any coolant lines. No aftermarket accordion style coolant lines allowed. Run as large of coolant lines as possible. AN line with ODs similar to factory coolant lines will have dramatically smaller IDs. This is a bad thing. Make sure your inner diameters are at least the same size as the OEM lines or you will have pressure drops.
Well designed, modern radiator cores can reduce pressure drops. This increases flow rates and puts less stress on your water pump as well. You can consider modified thermostats that have larger bypass holes, although this will increase warmup time. We honestly have not used them, so we aren’t able to offer direct feedback but have heard good things from the NASCAR crowd.
Airflow is queen
On most OEM cooling system designs, the radiator is poorly ducted. As discussed in our DIY Downforce article, ducting can greatly increase the cooling efficiency of the radiator core, while decreasing drag and increasing downforce at the same time. How is this done? By giving airflow less choice in the matter. Sealing off areas for air to spill around the radiator and forcing it to go through the radiator core is a great starting point. Making a duct to have roughly 1/3 the surface area of the core size of the radiator sealed to the bumper and smoothly transitioning to the full area of the core is even better!


Once airflow is well directed into the core, it needs a place to get out of the engine bay. Simple vents and louvers can assist here, while a full-blown duct transitioning to about 1/3 the surface area of the core is the best bet! That being said, designing an incoming duct for a front mounted radiator is fairly easy. The front of the car is a perfect high-pressure airflow source for this. Designing the outgoing airflow duct is usually a much more complicated task. Cars don’t tend to have easily accessible low pressure zones following the radiator to send the airflow into.
The little things
-Run the highest-pressure cap you possibly can, as long as the coolant system components are safety rated to those numbers. When all is said and done, the cap is merely a safety valve. If the system is designed for more pressure, a higher-pressure cap is appropriate. That being said, the higher pressure the system operates at, the more catastrophic a failure can be. Weigh the pros and cons and balance appropriately.
– Handy little pressure vs water boiling point chart.
10 psig = 239° F
20 psig = 259° F
30 psig = 273° F
40 psig = 286° F
50 psig = 297° F
60 psig = 307° F
70 psig = 316° F
-Use modern, single pass radiator designs whenever possible. High quality, dual pass radiators are also a viable option, particularly when tough mounting requirements and hose location necessitate a dual pass design. Triple pass radiators are almost always a no go. Multi-pass radiators increase coolant velocity, which helps with heat transfer and turbulence. However, this comes at the expense of the average temperature differential between the coolant and airflow. Multi-pass radiators also have a larger temperature difference between the inlet and outlet, but can’t flow as much coolant.
With modern radiator cores, turbulence is less of an issue and modern materials reject heat more quickly. Multi-pass cores are a bandaid for old water pump designs being unable to maintain coolant velocity and flow across large RPM ranges. Basically restricting flow in certain conditions to maintain flow in other conditions. Modern pumps don’t have this issue to the same degree.
-Under normal conditions your cooling system should get to 12-17 psig, going from ambient temperatures to operating temperatures.
-Standard coolant, which is generally 50% ethylene glycol and 50% water, has a specific heat of roughly 75% that of 100% pure water. What does this mean for you? Because it can only absorb approx. 3/4 the amount of heat per volume of flow, you have to increase the coolant flow to meet the same heat rejection capabilities of pure water. The higher boiling point of a 50/50 mix of coolant and water means you don’t need exactly 125% as much flow, but since most of us can’t increase water pump speeds, this is why pure water cools better than coolant.
-Want a cheap method of filling coolant without taking the radiator cap off? Here is the solution ex Sport Compact Car and current Mazda engineer, Dave Coleman wrote about for MotoIQ.
Thanks for making it this far. Write your comments and questions below!
All this techno talk has made me hot and increased my pressure, thank you <3
Great article. Lots of helpful stuff.
Thanks for being so forthcoming with information. I’m now planning some radiator ducting to go with my hood vent. Good stuff!
Great article! Just a really quick question. Would you recommend doing the 1/3 radiator ducting with a front mounted radiator on a drift car? I’ll imagine the high pressure zone won’t necessarily be right in front of the car if you approach a corner at an angle..
Great question. We are not drift specialists so there might be better sources of information but my gut feeling is that high flow fans, particularly the new crop of brushless models, would be more important than anything. Still, good ducting to keep the airflow through the core separated, so the hot exhaust air isn’t curling back around to the front of the radiator core would be wise as well. I bet off-road Baja truck builders could make a mean cooling system for drift cars!
2016 STI here. How would you properly duct the radiator with a 3″ FMIC slapped in front of it? Option B would be to sell the FMIC and upgrade the TMIC and worry about just ducting the radiator.
TMIC on Subarus is not recommended. The same guidelines still apply but FMIC size and location may require some adjustments. You want to duct to the radiator, intercooler combo if they are the width. You want to seal the intercooler to the radiator. It’s simply a matter of ensure airflow can’t easily bypass the cores.
I have a question about coolant flow…. from what I understood what you said, it´s better for a race car not to have a thermostact in the coolant system and let the water pump keep circulating the coolant flow??
It’s not as simple of an answer as no thermostat is better. Removal of the thermostat increases coolant velocity, which improves the efficiency of your cooling system but the engine needs to operate in a relatively small temperature window to perform optimally. Without the thermostat it may not be possible to reach that window. Companies modify the thermostat to increase flow but it also increases warm up time. Unfortunately, there is no easy answer and you should test what works best on your engine for the specific conditions it’s running in.
Great write up. What about interchilers? I run a 4.0t Audi and have wondered what if we pump freezing water through the cooling for the motor. Would that have any ill effects having freezing water cooling a hot engine?
From my understanding interchillers are meant to cool inlet air temperatures, not engine coolant. Either way, I’m not very familiar with interchillers, maybe someone else can chime in.
Dan, what about wall behind radiator? on which fans are usually located. Example: SpeedFactory Racing RAD. Is it possible to safely saw off this diffuser for a track? Will the car overheat in a traffic jam?
I assume you’re talking about a solid panel behind the radiator that a fan is attached to so all the air has to go through the fan. These are best used in situations where airflow can’t easily be ducted to the radiator and/or the application its used it puts the radiator as risk to damage if run in a normal position. Drifting and off-road racing come to mind. As long as the radiator and fans are sized properly, these work very well, albeit with strain on the electrical system.
I don’t understand the diffuser question, please feel free to clarify.
Would love to hear more about your thoughts on multipass radiators, and why the triple or dual pass designs are more or less effective than single pass.
I’ve updated and added to the article for more information. Thanks!
When designing a outgoing airflow duct from the radiator would directing the duct under the car be better than out of the hood?
“Better” depends on your goals. You want to have the outlet duct flowing into a low pressure zone. Under the car can work, but it can also create lift. Sometimes that’s a good compromise, sometimes it’s not. Most race cars do not go with this method. Most street cars do. Again, depends on your goals.